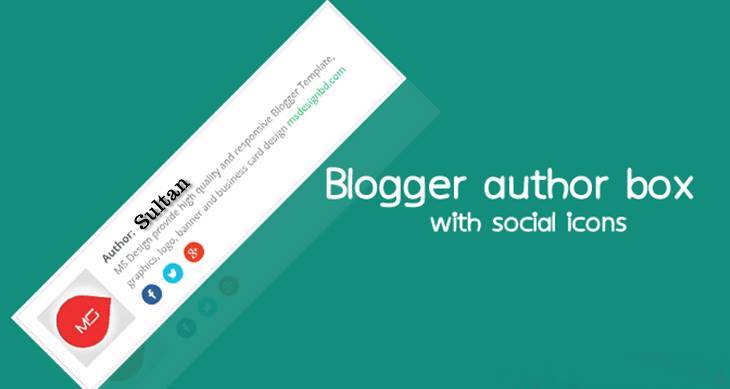
Blogspot me stylish blogger author box add kaise kare. Lekin iska jaydatar Blogger ko pata nhi hota hai. kyoki blogspot me About Author box add karne ke liye kya process hoti hai.
Jo aaj me apko is post me batane wala hu. About Author ko add karne se visitor post writer ke bare me jan jata hai. Aur sath hi unhe ye pata rahta hai. Ki wo kis website pe active hai.

Lekin bahut sare blogger ke post me stylish blogger author box add krna nhi hota hai. Her professional blogger ke post ke niche About Author box add hota hai. taki visitor apke bare me aur apke website ke bare me jan sake.
Isliye stylish blogger author box add karna chaiye. So agar aap bhi apne blog me About Author ko add karna Chahte hai. To Niche diye gaye sabhi steps ko follow kariye.
विषय-सूची
Blog post me About Author box ko add karna bahut simple hai. blogger author box ko add karne ke liye niche diye gaye sabhi step ko follow kare.
Step 1.
- Sabse Phale Apne blogger me Login kare.
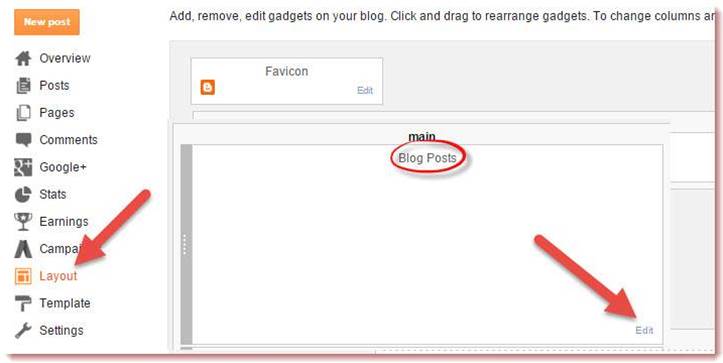
- Ab blogger ke dashboard me Layout per click kare.
- Ab Main blog posts widget per Edit per click kare.
- Ab New window open hogi.
Step 2.
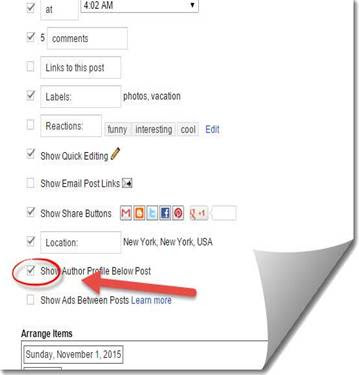
- Ab new Window me Show About Author Profile per tick kar de.
- Ab Save button per click kar de.
Step 3.
- Ab Dubara blog ke Dashboard per chale jaye..
- Ab template >> Edit HTML per click kare.
- AB template per kai per bi click karke CTRL+F press kare.
- Aur search box me ]]></b:skin> search kare.
- ]]></b:skin> ke uper diye gaye code ko paste kar de.
/* css about Author Box start by http://99techspot.in.*/
.articleAuthor{overflow:hidden;margin-bottom:10px}
.authorContent{overflow:hidden;background:#f1f1f1;padding:0;margin:1px;margin-bottom:0;border-top:2px solid #e9e9e9;}
.authorLeft{overflow:hidden;float:left;margin-right:10px;}
.authorLeft .authorAvatar{overflow:hidden;}
.authorLeft .authorAvatar img{background:#f1f1f1;display:inline-block;}
.authorDetails{overflow:hidden;margin:14px 0 0 0;}
.authorDetails h2{font-size:12px;color:#222;font-weight:400;text-transform:uppercase;}
.authorDetails h2 a{color:#4db2ec;background:#f1f1f1;padding:4px 8px;display:inline-block;font-size:15px;margin-left:5px;border:double #f1f1f1;}
.authorDetails h2 a:hover{color:#71c5f6;background:#f1f1f1;}
.authorDetails span{display:block;padding-top:3px}
.articleAuthor .authorContent p{color:#222;line-height:20px;margin:0 10px;font-size:15px;}
Background change karne ke liye color #f1f1f1 ki jagah per color code add kare.
Step 4.
- Ab Search Box Me <data:post.body/> ko search kare.
- <data:post.body/> ke niche ye code paste kare.
<div class=’articleAuthor’>
<div class=’authorContent’>
<div class=’authorLeft’>
<div class=’authorAvatar’>
<img alt=” class=’avatar avatar-120 photo dontshowit showit’ height=’120′ src=’https://www.georgiacannabis.org/wp-content/uploads/2015/11/blankman.png’ width=’120’/>
</div>
</div>
<div class=’authorDetails’>
<h2>
About Author<a href=’http://99techspot.in.com’ rel=’author’ title=’Admin’>your name</a></h2>
</div>
about you
</div>
</div>
Customization.
- Src ke just me apne image ka link add kare.
- 99techspot.in ke jagah per apne blog ka link add kare.
- About us jagah per apne bio ya apne details likhe.
- Code Set karne ke bad Save Template Per click kare.
- Agar aap blog post aur stylish about author box ke bich me thoda distance rakne chata hai. to code ke niche enter kare.
- Image link ka pata karne ke liye blogger per new post me photo upload karke campose html me Html per click karke link ko copy kare.
- Aur blogger me code 3 jagah per hota hai. Agar 1,2, me work na kare. To 3rd code ke niche code ko paste kare.
Finally Apko apne blog me stylish blogger author box add karna aha gaya hoga. Agar about author box ko add karne me khoi problem ho to hame comment karke puch skate hai.
Asha karta aapko stylish blogger author box add kaise kare. Post pasand ayhi hai. to post ko apne friend aut other blogger ke sath share jarur kare.
Read Most.
- Blog me alexa rank widget kaise add kare.
- Top 5 best Bullet list for blog.
- Top 10 best Marquee slider effect blog ke liye.


